> For the complete documentation index, see [llms.txt](https://ios-course.cornellappdev.com/llms.txt). Markdown versions of documentation pages are available by appending `.md` to page URLs; this page is available as [Markdown](https://ios-course.cornellappdev.com/resources/archived-past-semesters/fa23/assignments/a4-chefos.md).
# A4: ChefOS
Original Author: Vin Bui
{% hint style="danger" %}
**Midpoint Due: Sunday November 12, 2023 11:59pm**\
**Final Due: Thursday November 16, 2023 11:59pm**
{% endhint %}
{% hint style="info" %}
**If you are not enrolled in the course but would still like to complete the assignments, you can download the ZIP file below (note that you will not be able to enter any Git commands). Otherwise, we will create a repository for you.**
{% endhint %}
{% file src="/files/MePy2yyRAMGeIok4I6Z9" %}
## Overview
***
In this assignment, you will be creating a recipe book app. You will be able to fetch recipes from a server, filter by category, and save them for later!
## Learning Objectives
***
**Developer Skills**
* **How to organize your project directory**
* How to use Postman to test HTTP requests
* How to read code written by other developers
* How to read data received from the backend to structure frontend code
* How to work with Git and GitHub for version control
* How to read documentation from outside resources
* How to format and structure your code to follow MVC design pattern
* How to follow common styling conventions used in industry
* How to implement designs created on Figma
**Course Material**
* **How to set up multiple collection views and communicate between them**
* **How to filter data using higher order functions**
* **How to save data locally using ****`UserDefaults`**
* How to represent lists of data using a `UICollectionView` and a `UICollectionViewCell`
* How to send GET requests to a backend API using Alamofire
* How to write callbacks (completion handlers) to handle asynchronous calls
* How to create a `NetworkManager` singleton class to contain network calls
* How to decode a JSON using a `JSONDecoder` in Swift
* How to handle errors with networking calls
## Academic Integrity
***
As with any other course at Cornell, the Code of Academic Integrity will be enforced in this class. All University-standard Academic Integrity guidelines should be followed. This includes proper attribution of any resources found online, including anything that may be open-sourced by AppDev. The University guidelines for Academic Integrity can be found [here](https://theuniversityfaculty.cornell.edu/academic-integrity/).
**This assignment can be done with ONE partner.** You are also free to come to the instructors or any course staff for help. Programming forums like *Stack Overflow* or *Hacking with Swift* are allowed as long as you understand the code and are not copying it exactly. **The majority of code (excluding external libraries) must be written by you or your partner.** Code written through AI means such as ChatGPT is **NOT ALLOWED**. However, you may use these resources for assistance, although we highly encourage consulting Ed Discussion or office hours instead.
## Getting Help
***
If you are stuck or need a bit of guidance, please make a post on Ed Discussion or visit [office hours](/resources/archived-past-semesters/sp25/logistics/office-hours.md). **Please do not publicly post your code on Ed Discussion.** If you are using an external resource such as Stack Overflow, keep in mind that we are using UIKit with Swift 5. If you see anything with @IBOutlet or any weird syntax, then you are most likely looking at a different version.
## Grading Rubric
***
{% hint style="info" %}
**Due to the shrinking of the course, the features implemented up to the midpoint submission will be worth more than after.**
{% endhint %}
The feedback form link is located in the [Submission](#submission) section of this handout.
* `UI`: implements the user interface
* `F`: implements the functionality
* `EC`: extra credit
| **PART I: Recipe CollectionView** | **\_ / 4** |
| ------------------------------------------------------------------------------------------------- | -------------------------------------------------- |
| UI: Name, Image, Time, Rating | \_ / 2 |
| UI: 2 columns, Dynamic number of cells (adding a new item to the array creates a new item/cell) | \_ / 1 |
| UI: Each cell is unique and represents a different Recipe | \_ / 1 |
| **PART II: Detailed Recipe View** | **\_ / 3** |
| UI: Image | \_ / 1 |
| UI: Name and Description | \_ / 1 |
| F: Tapping on a Recipe cell pushes a detailed view | \_ / 1 |
| **PART III: Filtering** | **\_ / 3** |
| UI: Collection view for filters WITH horizontal scrolling | \_ / 1 |
| UI: Selected filter is highlighted (separate from functionality) | \_ / 1 |
| F: Tapping on a filter filters the recipe data (one at at time; stacking filters is extra credit) | \_ / 1 |
| **PART IV: Fetching Recipes** | **\_ / 1** |
| F: GET Request to Fetch Recipes | \_ / 1 |
| **PART V: Bookmark Recipes** | **\_ / 2** |
| F: Bookmarking from the detailed view updates the collection view using delegation | \_ / 1 |
| F: Saved recipes are stored locally via UserDefaults (restart app to check) | \_ / 1 |
| **OTHER** | **\_ / 2** |
| Feedback Survey | \_ / 1 |
| Styling: `viewDidLoad` calls helper functions | \_ / 1 |
| **SUBTOTAL** | **\_ / 15** |
| EC: Custom back button | + 1 |
| EC: Stacking filters | + 1 |
| EC: Nesting collection views | + 1 |
| EC: Separate bookmark page | + 2 |
| Deduction: Crash Tax | -1 point |
| **GRAND TOTAL** | **\_ / 15 (+5)** |
## Getting Started
***
### Using Postman
You are encouraged to use [Postman](https://www.postman.com/) to test out HTTP requests. Please take a look at the [Postman guide](/resources/tool-guides/postman.md).
### Using Figma
Similar to A2 and A3, we will be using Figma for the design sketches. You can find the link to the Figma [here](https://www.figma.com/file/rCPlphpMKQZDLFIld6x0Cj/A4%3A-ChefOS?type=design\&node-id=1%3A23\&mode=design\&t=Ms5BRPZtDqKdt41m-1). If you do not have an account, you can create one under your Cornell email. If you need a refresher, check out the [Figma guide](/resources/tool-guides/figma.md).
### Using Git
If you are having trouble understanding how we will be using Git in this course, please read the A1 handout under [Understanding Git and GitHub](broken://pages/hIeuzlyHR8Hw5Q4NtZF3#understanding-git-and-github) section, or visit office hours so we can assist you. As a reminder:
1. **Stage:** `git add .`
2. **Commit:** `git commit -m "YOUR MESSAGE HERE"`
3. **Push:** `git push`
### Cloning the Repository
Navigate to a folder on your device where you will keep all of your assignments. You can navigate to the folder using `cd` in Terminal.
Clone the repository on GitHub:
* Replace **NETID** with your NetID
* Replace **SEM** with the semester (such as `fa23` or `sp24`)
```powershell
git clone git@github.coecis.cornell.edu:cs1998-601-SEM/NETID-a4.git
# Ex: git clone git@github.coecis.cornell.edu:cs1998-601-fa23/vdb23-a4.git
```
If you have a partner, replace **NETID1** and **NETID2**. Try changing the order if the former does not work.
```powershell
git clone git@github.coecis.cornell.edu:cs1998-601-SEM/NETID1-NETID2-a4.git
```
If you are lost or getting any kind of error, create a post on Ed Discussion or come to office hours.
### Opening the Project
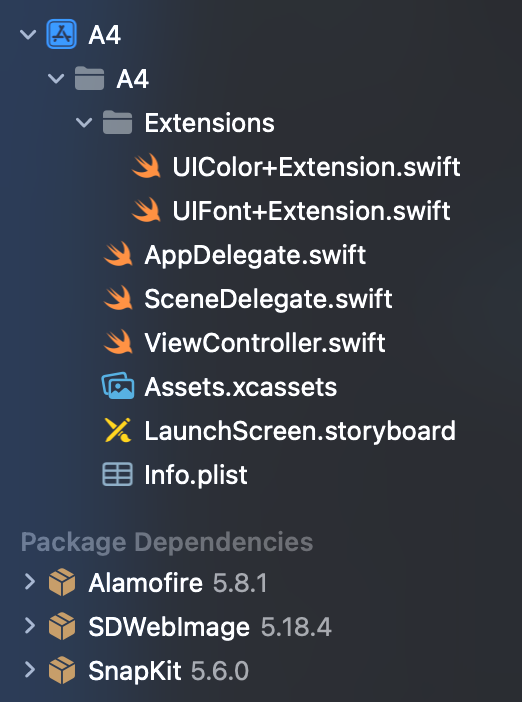
Navigate to the repository located on your local computer drive. Inside of the folder `NETID-a4` should contain an Xcode project called `A4.xcodeproj`. Open up the project.
### Locating the Source Code
Once you have the project opened, on the left side of the screen you should see the Navigator which contains all of the folders and files in the directory. If not, press `CMD + 0` (that’s a zero) on your keyboard. You may notice that there is less starter code than in A2 and A3. As developers, directory organization is very important! Look at A2/A3 to see how we organized our directory. **Remember to use those ****`// MARK`**** comments!**
## Assignment Files
***
As mentioned earlier, there is less starter code. You will be required to create your own files and organize them properly. However, there are only two files provided for you.
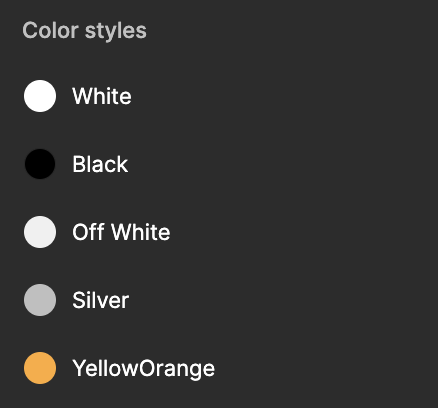
### `UIColor+Extension.swift`
In contrast to A3, you are free to edit this file if you want to change the colors. This file contains colors that are featured in the [Figma](https://www.figma.com/file/rCPlphpMKQZDLFIld6x0Cj/A4%3A-ChefOS?type=design\&node-id=1%3A23\&mode=design\&t=Ms5BRPZtDqKdt41m-1) design. To use the colors, simply type `UIColor.a4.`. It is good practice to implement the design system before starting any project, making it very easy to use throughout the entire project. **Look over this file to understand how it works and keep note of the colors available for you to use.**
From the Figma Design
### `UIFont+Extension.swift`
This extension allows you to use the SF Pro Rounded font which is used in the Figma design. To use this font, simply add `.rounded` to the end of the `UIFont`. For example, you can do `.systemFont(ofSize: 12, weight: .semibold).rounded`.
## External Libraries
***
The starter code should have Alamofire, SnapKit, and SDWebImage installed. To use these libraries, use the `import` statement at the top of the file. You are not required to use SnapKit, but it would save you a lot of time learning how to use it over NSLayout.
{% hint style="info" %}
**Source: All of the recipes used in this assignment are from** [**allrecipes.com**](https://www.allrecipes.com/)**.**
{% endhint %}
## Part I: Recipe CollectionView
***
**Your task is to create a UICollectionView to display the recipes.** We will not guide you as much as we did with the other assignments, but keep the following in mind:
* You are not required to implement the bookmark icon until Part V, but you are free to do so now.
* You will not be implementing the filters until Part III.
* You will need to create dummy data. For the sake of time and convenience, I have them written out for you in this [Pastebin](https://pastebin.com/KPrsHR38). Make sure your model aligns with the given dummy data since the JSON you will be fetching from follows this format.
* We want the collection view to be scrollable even when not full. Simply set `alwaysBounceVertical = true`.
* You do not have to worry about dynamic cell size. Set the text labels’ line limit to `2` lines and the height of the cell to around `216`. The width, however, will depend on the size of the screen. Remember, we want to have two columns. *Hint: We can multiply/divide the screen’s width by a certain factor.*
* **Do not save recipe images in the Assets catalog. We will be using SDWebImage to download images from URLs.**
{% hint style="danger" %}
**While creating this assignment, I ran into a bug with the collection view. Make sure to set the collection view’s ****`alwaysBounceVertical`**** property to ****`true`****.**
{% endhint %}
### Using SDWebImage
There are many ways to download images in Swift, but the easiest way in my opinion is using SDWebImage. Using this library is very simple.
1. Import the library using `import SDWebImage` at the top of the file.
2. Given a `UIImageView`, simply use the `.sd_setImage(with: )` function. Here is an example:
```swift
// Given a UIImageView called `imageView` and a Recipe object with
// the property `imageUrl`
imageView.sd_setImage(with: URL(string: recipe.imageUrl))
```
**Once you are done, stage, commit, and push to GitHub.**
## Part II: Detailed Recipe View
***
**Your task is to create a view controller representing a detailed recipe view.** You will push this view controller when tapping on the collection view cell. This detailed view will be unique to the recipe.
This is very straight-forward and there aren’t any tricks. Just make sure that your `Recipe` model aligns with the given dummy data in this [Pastebin](https://pastebin.com/KPrsHR38) (the data type of your fields matter). Remember to use SDWebImage to download the images and to implement the correct function to handle tapping on a cell. You also need to figure out which labels will have multiple lines. Click on every single cell to check for edge cases.
**Once you are done, stage, commit, and push to GitHub.**
## Part III: Filtering
***
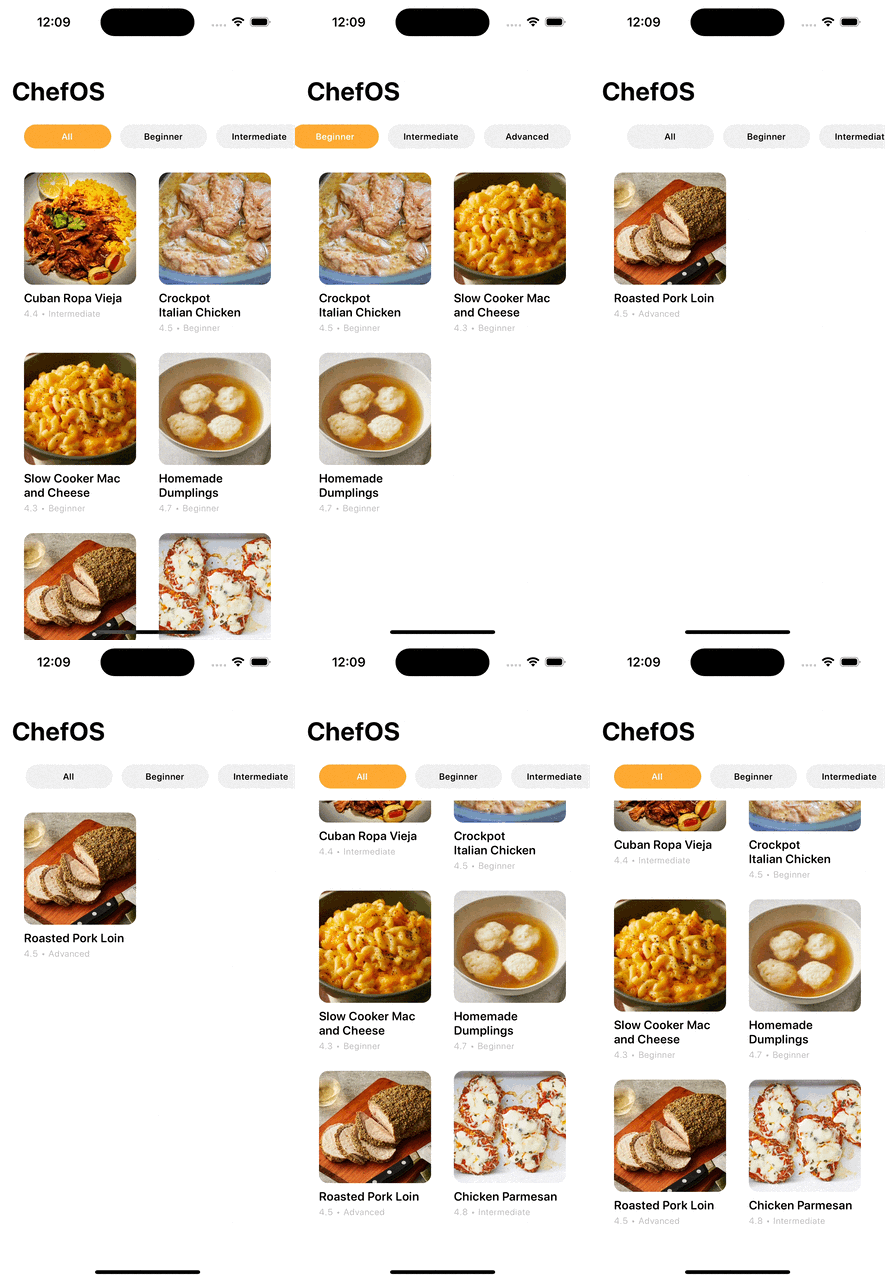
**Your task is to create a horizontally scrolling collection view that represents the filter pills as well as adding filtering functionality.**
Here is a quick demo of what we’re expecting:
### Handling Multiple Collection Views
The tricky part to this task is that there are now two collection views inside of this view controller. Since it’s not possible to create multiple `cellForItemAt` functions, for example, then you need to handle the logic within the function itself. You can do this with an `if` statement and checking to see if the parameter `collectionView` is equal to the collection view property.
```swift
if collectionView == collectionViewOne {
// Do something here for collectionViewOne
} else if collectionView == collectionViewTwo {
// Do something here for collectionViewTwo
}
```
### Filter Collection View
* You want the collection view to span over the entire screen’s width so the leading and trailing anchors need to equal to the parent view. To add an inset to the collection view’s content, you can configure the `contentInset` property.
* There are 4 filters: All, Beginner, Intermediate, and Advanced. You can create an array of strings as the data model and use the string to configure the collection view cell which you can use a `UIButton` to represent.
* If you want, you can disable the scroll indicator for a cleaner scrolling view.
* You ***do not*** have to handle dynamic cell width. A height of `32` and width of `116` should work.
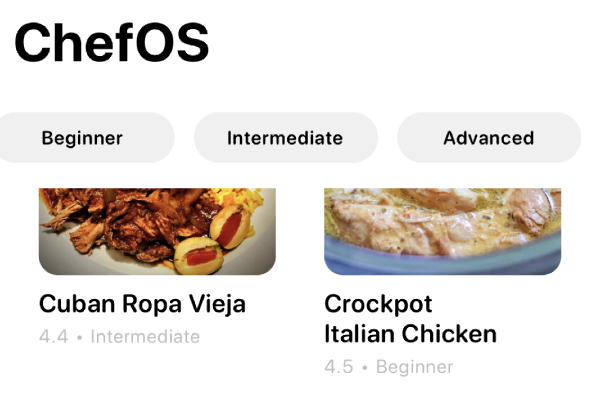
* The filter collection view ***does not*** have to scroll vertically with the recipe collection view. This requires nesting collection views inside each other which is a very tedious process. You can have the recipe collection view cut off like this if scrolled:
### Filtering Logic
* You ***do not*** need to handle filter stacking. This is somewhat advanced so we will leave that for extra credit.
* There are many ways to determine if a cell is selected, so I will leave this up to you to decide. Make sure that the currently selected tab is highlighted with a white text color. If you are lost and have no idea where to start, feel free to ask on Ed Discussion or come to office hours.
* There are also many ways to change the value of the selected filter. You can configure `didSelectItemAt` or use delegation to communicate from the cell’s button to the view controller.
* To filter the array of recipes, you can use the `filter` higher order function. As a hint, you should have two properties containing the array of recipes: one for all recipes and another for filtered recipes.
**Once you are done, stage, commit, and push to GitHub.**
{% hint style="success" %}
✋🏻 **This is the stopping point for the midpoint submission. We will grade you for completion based on your GitHub commit history.**
**No further action is required, but if you would like for us to read over it, create an Ed Discussion post. Otherwise, you can keep working.**
{% endhint %}
## Part IV: Fetching Recipes
***
**Your task is to create a GET request to fetch all recipes from this API:**
```
https://api.jsonbin.io/v3/b/64d033f18e4aa6225ecbcf9f?meta=false
```
You can use Postman to test the HTTP request. You will need to create a `NetworkManager` class with a `shared` singleton instance. You will be using Alamofire so make sure to import this library. See the lecture, textbook, or A3 for reference.
Error handling is not required but is nice to have. You will know if you integrated it correctly if there are more recipes than the dummy data. As a reminder, the JSON uses snake\_case but Swift uses camelCase.
Networking is one of the most important but difficult concepts to learn and implement. We want you to get as much practice as you can to prepare you for the Hack Challenge. If you are confused, please create a post on Ed Discussion or visit office hours.
{% hint style="danger" %}
**Make sure that filtering still works properly!**
{% endhint %}
**Once you are done, stage, commit, and push to GitHub.**
## Part V: Bookmark Recipes
***
**Your task is to implement bookmarking functionality for these recipes.** You will need a way to keep track of bookmarked recipes to save them locally via UserDefaults.
* First, figure out what data structure you will use to keep track of bookmarked recipes. Then, think of a key that you will use to access through UserDefaults.
* Recipes that are bookmarked should have a bookmark icon in their cell. See the Figma for UI details.
* You will need to create a `UIBarButtonItem` to represent the bookmark button. This button will be in the detailed recipe view on the top right corner. If the recipe is already saved, the bookmark button will be filled and tapping on it will remove it from the saved recipes.
* The bookmark icon should change immediately on press. You will also need to use delegation to reload the recipe collection view so that the cells will be properly updated. Remember to use a weak reference!
* All saved recipes should be stored locally. You can check by restarting the app. If the saved recipes do not reset, then you are good to go.
Here is a quick demo of what we are looking for:
{% file src="/files/OJ2hEDPeJJYPDanjBwOq" %}
**Once you are done, stage, commit, and push to GitHub.**
{% hint style="success" %}
✋🏻 **If you reach this point, you are done with the assignment. However, feel free to challenge yourself with the extra credit features.**
{% endhint %}
## Extra Credit
***
{% hint style="danger" %}
**Extra credit will only be given if the features are *****fully***** implemented. These are unordered and you can choose as many as you like.**
{% endhint %}
### 1: Custom Back Button (+1 pt)
**Your task is to create a custom back button.** The [Figma](https://www.figma.com/file/rCPlphpMKQZDLFIld6x0Cj/A4%3A-ChefOS?type=design\&node-id=1%3A23\&mode=design\&t=Ms5BRPZtDqKdt41m-1) has a possible design for this, but you are free to use any button you like. This should be a freebie if you finished the task in Part V.
### 2: Stacking Filters (+1)
Right now, you can only select one filter at a time. **Your task is to allow for filter stacking**. All selected filters should be highlighted and the collection view should contain all selected filters.
### 3: Nesting CollectionViews (+1)
Right now, you have two separate collection views: one for the filters and the other for the recipes. Because these collection views have different scrolling directions, if we wanted to make them both scrollable vertically, then we will have to nest collection views. **Your task here is to nest collection views so that the filters scroll with the recipes.** In other words, if I scroll up, the filters should scroll up as well while maintaining its horizontal scrolling attribute.
### 4: Separate Bookmark Page (+2)
**Your task here is to create a page listing out all bookmarked recipes.** The design is up to your creativity, but there needs to be some way to push the detailed recipe view where you can then bookmark/unbookmark. You may also need to use delegation to update this bookmark list, similar to what you did in Part V.
**Once you are done, stage, commit, and push to GitHub.**
## Submission
***
1. Double check that all of your files are properly pushed to GitHub.
2. Clone your repository into a **separate** folder on your local computer drive.
3. Run your project and make sure that your code does not crash and everything works as needed.
4. If you are satisfied, download this TXT file and fill it out. Make sure to use the **Clone SSH path**.
{% file src="/files/ZXdNMAmmGlCLk6zh3jDD" %}
5. Confirm that your `submission.txt` is formatted like the following and submit it on [CMS](https://cmsx.cs.cornell.edu/web/guest/).
```
Name: Vin Bui
NetID: vdb23
GitHub Repository: git@github.coecis.cornell.edu:cs1998-601-SEM/NETID-a4.git
Extra Credit:
+1 : ____
+1 : ____
+1 : ____
+1 : ____
+2 : ____
```
6. Fill out this [feedback survey](https://forms.gle/YbmGnyZvG2Tre86b6) (worth 1 point).
{% hint style="info" %}
**If you are partnered, make sure to create a group on CMS and put both names in the ****`submission.txt`**** file. Both students must fill out the feedback survey to receive credit.**
{% endhint %}