Intro to iOS Development
  • Welcome
    • ☀️Introduction
    • 🐣Getting Started
    • 🐦Course Staff
  • Logistics
    • 📜Syllabus
    • 🗓️Schedule
    • 🖊️Grading
    • 🙋‍♂️Office Hours
    • Ed Discussion
  • Assignments
    • 🍼A1: Swift Basics
    • 🧑A2: Profile
    • 💬A3: ChatDev
    • 👨‍🍳A4: ChefOS
    • 👨‍🍳A4: ChefOS - SwiftUI
    • 📱Hack Challenge
      • 🏆FA23 Winners
  • Lectures
    • 1️⃣Logistics + Swift Basics
    • 2️⃣UIKit + AutoLayout
  • 3️⃣MVC + Navigation + Delegation
  • 4️⃣UITableView
  • 5️⃣UICollectionView
  • 6️⃣Networking I
  • 7️⃣Networking II
  • 8️⃣SwiftUI I
  • 9️⃣SwiftUI II
  • 🔟Persistence + SnapKit
  • 🔔(11) Notifications
  • 🌎(12) Deployment and MapKit
  • Chapters
    • 🖐️Introduction
    • ☁️Git + GitHub
      • 1️⃣Git Installation
      • 2️⃣Git Basics
      • ➕Git+
    • 🐣Swift Basics
      • 1️⃣Variables and Constants
      • 2️⃣Data Types
      • 3️⃣Operators
      • 4️⃣Data Structures
      • 5️⃣Conditionals
      • 6️⃣Loops
      • 7️⃣Functions
      • 8️⃣Closures
      • 9️⃣Optionals
    • 🧰UIKit + AutoLayout
      • 1️⃣Classes
      • 2️⃣UIKit
      • 3️⃣AutoLayout
    • 📺MVC + Navigation + Delegation
      • 1️⃣MVC
      • 2️⃣Navigation
      • 3️⃣Delegation
    • 🏓UITableView
      • 1️⃣What is a UITableView?
      • 2️⃣UITableView Setup
    • 📚UICollectionView
      • 1️⃣What is a UICollectionView?
      • 2️⃣UICollectionView Setup
    • 🌐Networking I
      • 1️⃣HTTP Requests
      • 2️⃣Callbacks
      • 3️⃣Codable
    • 🌍Networking II
      • 1️⃣Alamofire
      • 2️⃣GET Requests
      • 3️⃣POST Requests
      • 4️⃣URLSession
    • 💾Persistence + SnapKit
      • 1️⃣Persistence
      • 2️⃣SnapKit
    • 🕊️SwiftUI
      • 1️⃣Introduction to SwiftUI
      • 2️⃣Getting Started with SwiftUI
      • 3️⃣Views + Modifiers
      • 4️⃣Layouts
      • 5️⃣Navigation
      • 6️⃣Property Wrappers
    • 🎛️Widgets
      • 1️⃣Introduction to Widgets
      • 2️⃣Setting Up Widgets
      • 3️⃣Building Widgets
      • 4️⃣Configuring Widgets
    • 🧱Project Foundation
    • ✅Testing
      • 1️⃣Unit Testing
    • 👣Debugging
      • 1️⃣OSLog
      • 2️⃣Crashlytics
      • 3️⃣Analytics
    • ☁️CI/CD
      • 1️⃣Xcode Cloud
      • 2️⃣AppStore Shipping
  • Guides
    • 🔨Xcode Project Setup
    • 🎨Figma
    • 📬Postman
    • 🥥CocoaPods
    • 🧰UIKit Handbook
    • 📑Tab Views
      • UITabBarController
      • TabView
  • Work in progress
    • 🧵Concurrency
    • 2️⃣UI Testing
    • 🕐Reactive Programming
    • 🧠Memory Management
      • 🔁ARC
    • 📦Storage
    • 📣Notifications
  • Archived
    • SP24
      • Logistics
        • 📜Syllabus
        • 🗓️Schedule
        • 🖊️Grading
        • 🙋‍♂️Office Hours
      • Assignments
        • 🍼A1: Swift Basics
        • 🧑A2: Profile
        • 💬A3: ChatDev
        • 👨‍🍳A4: ChefOS
        • 📱Hack Challenge
          • 🏆FA23 Winners
      • Lecture
        • 0️⃣Course Intro + Logistics + Git Setup
        • 1️⃣Swift Basics
        • 2️⃣UIKit + AutoLayout
        • 3️⃣MVC + Navigation + Delegation
        • 4️⃣UITableView
        • 5️⃣UICollectionView
        • 6️⃣Networking I
        • 7️⃣Networking II
        • 8️⃣Persistence + SnapKit
        • 🔟SwiftUI
        • 🔢TabViews
    • FA23
      • Logistics
        • 🐣Getting Started
        • 🐦Course Staff
        • 📜Syllabus
        • 🗓️Schedule
        • 🖊️Grading
        • 🙋‍♂️Office Hours
      • Assignments
        • 🍼A1: Swift Basics
        • 🧑A2: Profile
        • 💬A3: ChatDev
        • 👨‍🍳A4: ChefOS
        • 📱Hack Challenge
          • 🏆FA23 Winners
      • Lectures
        • 0️⃣Course Intro + Logistics
        • 1️⃣Swift Basics
        • 2️⃣UIKit + AutoLayout
        • 3️⃣MVC + Navigation + Delegation
        • 4️⃣UITableView
        • 5️⃣UICollectionView
        • 6️⃣Networking I
        • 7️⃣Networking II
        • 8️⃣Persistence + SnapKit
        • 🎛️Widgets
          • 👼Introduction to Widgets
          • ⚒️Setting Up Widgets
          • 🧱Building Widgets
          • 👨‍💻Configuring Widgets
        • 🔟SwiftUI
    • SP23
      • Logistics
        • Lecture Schedule
        • Syllabus
        • Grading
        • SP23 Office Hours
      • Chapters
        • 1. Intro to Swift & Xcode
          • Lecture Handout
          • Lecture Demo
          • 🍼Project: Swift Basics
        • 2. UIKit and AutoLayout
          • Lecture Handout
          • Lecture Demo
          • 🛒Project: UIKit + AutoLayout
        • 3. Navigation, MVC, and Delegation
          • Lecture Handout
          • Lecture Demo
          • Project: Navigation + Delegation
        • 4. UITableView
          • Lecture Handout
          • Lecture Demo
          • Project: UITableView
        • 5. UICollectionView
          • Lecture Handout
          • Lecture Demo
          • Project: UICollectionView
        • 6. Networking I
          • Lecture Handout
          • Lecture Demo
          • Project: Persistence
        • 7. Networking II
          • Lecture Handout
          • Lecture Demo
            • Message Board
          • Project: Networking II
        • 8. Swift UI
        • 9. CocoaPods
          • 🍫Lecture Handout
          • 🧑‍🍳Lecture Demo
      • Cheat Sheets
        • Setting Up a New Xcode Project
        • Submitting Your Projects
        • Setting Up CocoaPods
    • 2022
      • SwiftUI
    • 2021
      • Adding Flare
      • Project: UIView Animations (Optional - Extra Credit)
      • UIView Animations
      • Xcode Tips and Tricks
    • 2019
      • Firebase
      • Persistence: UserDefaults
  • Swift Guide (ARCHIVED)
    • About this Textbook
    • Documentation
    • Constants and Variables
      • Variable Properties
      • Lazy and Static Variables
    • Functions
    • Ranges
    • Arrays
      • Basic Array Operations
      • Iteration and Enumeration
      • Advanced Array Operations
    • Tuples
    • Conditions and While Loops
    • For Loops
    • Enums and Switches
      • Enums with Associated Values
      • Indirect Enums
    • Classes and Structs
    • Optionals
    • Dictionaries
      • Dictionary Implementation
    • Closures
    • Constraints
    • Generics
    • Protocols
      • Protocols With Associated Types
    • Casting
    • Errors
    • Networking
      • Result
    • Inout
Powered by GitBook
On this page
  • Table of Contents
  • What is it?
  • No, but what is it really?
  • How are the views set up?
  • Why use one?
  • How can I set one up?

Was this helpful?

Export as PDF
  1. Guides
  2. Tab Views

UITabBarController

Original Author: Tiffany Pan

PreviousTab ViewsNextTabView

Last updated 1 year ago

Was this helpful?

Table of Contents

  1. What is it?

  2. How can I set one up?


What is it?

An UITabBarController is most commonly used to create the tab switching functionality when developing in UIKit.

@MainActor
class UITabBarController : UIViewController

@MainActorsimply indicates and enforces that this View Controller performs its actions on the main thread. This means that any UI updates made to our tab view controller (tapping on a tab) will always be updated on the main thread. See more about concurrency in Concurrency.

No, but what is it really?

At its core, an UITabBarController is simply a container view controller that allows the user to select between designated child view controllers to display. The selection is done via tab icons that we all know and love, namely something like

How are the views set up?

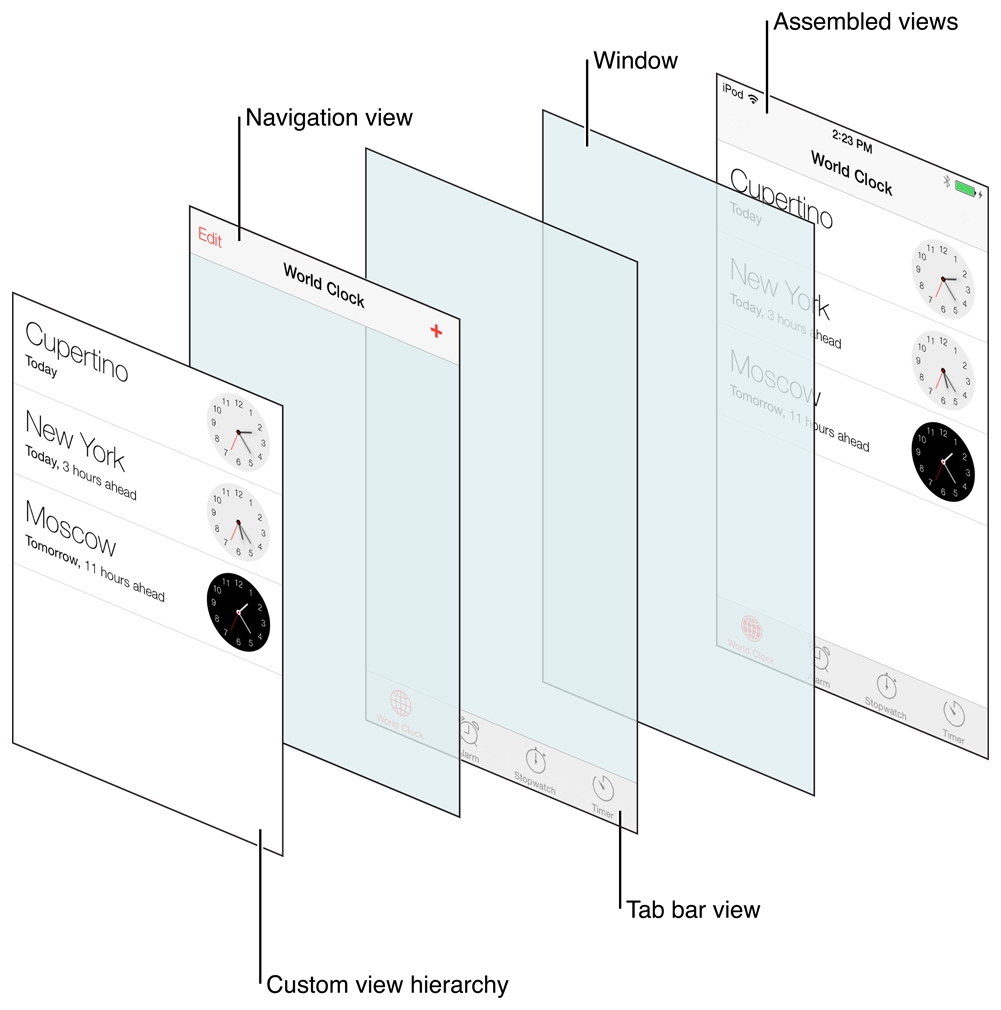
Under the hood, the actual view of a tab bar controller (when displaying a piece of content) is simply a container that holds 2 things:

  1. The actual tab bar view

  2. The view that contains your designated custom content

The tab bar view allows for the selection controls and can contain one or more tab items. The custom view contains what you designate as the root view for the currently selected tab. The image above demonstrates how the views are combine to create a cohesive tab bar interface.

Why use one?

Developers generally tend to use tab views for myriad of things, such as displaying a bunch of different functionalities and presenting information in different ways. In any case, the important thing to note is that an UITabBarController allows you to manage completely different interfaces in each tab - i.e. each tab can hold completely different views.

A TabBarController is powerful because it handles the tab switching for you - you only need to specify the specific root views for each tab by instatiating an UITabBarItem and it handles the rest of the logic, including updating the UI when the user taps on a tab. Let's dive more into how we can set one up.


How can I set one up?

Assuming you have a few root views set up (not built out is fine, but as long as the UIViewController classes have at least all been created) that you want to embed as "tabs" in your application. In this case, let's use the Spotify example I snipped earlier for ours. Spotify contains 3 tabs: a home page, a search page, and lastly a library one.

Let's first define this home page, as we would with any View Controller we create. You'd do the same with the search and library one.

import UIKit

class HomeViewController: UIViewController {

    override viewDidLoad() {
        // I like to use other colors when testing
        // to make tab-switching very obvious.
        view.backgroundColor = .systemRed
        ... // Set up this view.
    }
    
}

Then, let's define our UITabBarController in a new file. Remember, this class acts as the container view that controls the selection of tabs.

import UIKit

class TabViewController: UITabBarController {
    
    override func viewDidLoad() {
        super.viewDidLoad()    
    }
    
}

To create tab bar icons and set up our views, there are a few steps. We can define a function to do so.

// MARK: - Setup Tabs
private func setupTabs() {

    // Instantiate view controllers
    let homeVC = HomeViewController()
    let searchVC = SearchViewController()
    let libraryVC = LibraryViewController() // ... etc...
    
    // Customize the tab items. You can insert any image here, using
    // UIImage(named: ...)
    homeVC.tabBarItem = UITabBarItem(title: "Home", image:     UIImage(systemName: "house"), tag: 0)
    searchVC.tabBarItem = UITabBarItem(title: "Search", image: UIImage(systemName: "magnifyingglass"), tag: 1)
    libraryVC.tabBarItem = UITabBarItem(title: "Library", image: UIImage(systemName: "books.vertical"), tag: 2)
    // ... Set up other tabs ...
    
    // Set the UITabBarController's View Controllers
    self.setViewControllers([homeVC, searchVC], animated: True)
}

We can then call this function in the viewDidLoad()of our TabViewController class.

override func viewDidLoad() {
    super.viewDidLoad()
    setupTabs() 
}

The basic functionality of a tab view controller is all set up! Now, you can simply create and use it as you would with any other ViewController: TabViewController(). If you'd like it to be first thing the user sees when opening the app, you can modify the SceneDelegate.swift file to set it as the app's root view controller like so, which follows Xcode Project Setup.

func scene(_ scene: UIScene, willConnectTo session: UISceneSession, options connectionOptions: UIScene.ConnectionOptions) {
N
}

If you want a certain tab to be the "main" tab (i.e. the one that the tab view opens on), you can do so via the tab view's .selectedIndex property.

private func setupViews() {
    /// ... Other code ...
    // Designate the initial index. 0 refers to the first tab. 
    selectedIndex = 0 
}
The anatomy of a tab view.
📑
Spotify tabs. Users can easily select between the app's 3 main functionalities.